Products Used:
-Barry M Base Coat, Top Coat & Nail Strengthener
-Barry M Bright Red Nail Paint (262)
-1 teabag (mine happened to be of the PG Tips pyramid variety ;)
-Scissors
Last night whilst filing my nails I noticed a tiny little nick in the side of my thumbnail, thought nothing of it, went to bed and went about my business today. Then later today I noticed the little nick had turned into a full on split. It's pretty low down meaning I'd have to trim my nail down very short to get rid of it and avoid further splitting.
I've seen a few videos about using a teabag to help strengthen the split, allowing you to grow it out - as I'm trying to grow my nails I thought I'd give it a go. I'm estimating it's going to be about 2 weeks for the split to grow out at the rate my nails grow so I'm going to do a follow-up blog. I don't mind repeatedly applying a little square of teabag every time I re-paint my nails if it means I'm not going to have to trim it down.

The split in question - complete with arrows to point out the dreadfulness of it all! ;)
Please ignore how the second image makes my cuticles look like death - I can assure you they're happy and moisturised in reality.
Firstly I washed my hands of course, then cut a piece of teabag this size:

Then applied some clear nail polish to the area I was going to be applying it to, and placed the tea bag square right up to the edge of the split ensuring it covered it completely:

The bottom half of the tea bag wasn't stuck on fully – at this point I was thinking there's no way I'm walking around with a huge white hunk of tea bag stuck to my finger like an idiot. A bit more clear nail polish to attach it fully soon sorted it out however.
I applied a generous top coat of clear polish and to my delight the square became invisible and smooth:


(Super close up with the light reflecting off it - I'm sure if you were looking at it ridiculously close or with a magnifying glass it would be slightly noticable but I think you can get away with just clear polish.)
To cheer myself up I whipped out my favourite red polish (Barry M Bright Red nail paint).

This is 2 coats + topcoat - no visible tea bag at all. The consistency of the polish is more of a jelly red than a creme.
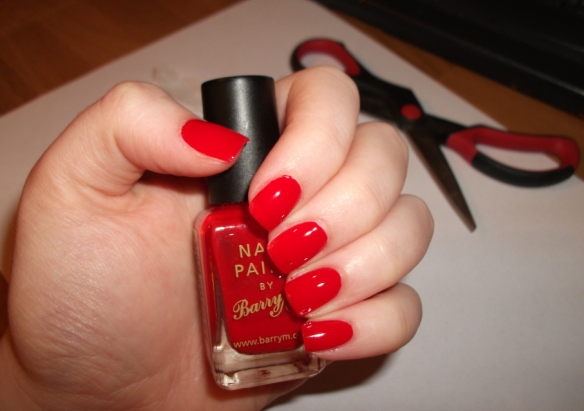
(click to enlarge)
And voila! A full set of happy red nails, which completes the 'Tea Bag Method' application and NOTD :)
I'll update on the end result.
-LadyDanger
xxx